


DIY Wall Decal Always Kiss Me Goodnight is easy to apply in 3 easy steps, outlined in detail below. If you are a DIYer, applying decals to your walls is a beautiful, quick and inexpensive way to add beauty to your home. Our Always Kiss Me Goodnight Vinyl Wall Decal can be ordered in a variety of sizes and colors and includes step by step instructions.
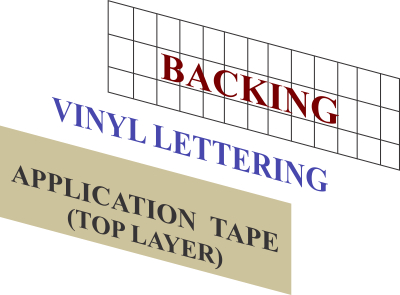
Your decal contains 3 layers. The backing, which contains a grid, the decal/vinyl lettering itself, and the top layer which looks like masking tape. Instructions are as follows (or see video here):
Step 1
Place your decal, right side up, on a flat surface. The application tape layer should be on top facing you and the gridded backing should be facing down. Using the line that has been drawn on your decal and a level, position your decal on your wall, using a few pieces of blue painters tape. Check with a level to make certain your vinyl lettering/decal is level. With a light pencil, mark/trace all four corners of your vinyl lettering and remove from the wall.
Step 2
Place the vinyl lettering decal face down on a table. The grid backing should be facing up. Slowly remove the backing. The vinyl lettering should stay attached to the layer that looks like masking tape. Once the backing has been removed, keeping the decal taut and position it back onto your wall using the lightly penciled corners as a guide, sticky side down of course. Beginning at the top of the decal, smooth with your hand, from top to bottom. As you smooth from top to bottom, allow the decal to come down gently. Gently smooth the rest of the decal working from center to all edges of the decal. With a credit card, firmly rub/scrape your entire decal going to top to bottom beginning in the center. This step ensures excellent contact between your surface and the decal and will remove air bubbles.
Step 3
Starting in a corner, gently peel back the top application tape layer, keeping the peeled back portion flat against your surface. If your decal lettering begins to come off with the application tape layer, replace the top layer, press firmly on top with your finger and resume removal of the top layer. To see our How-to video for vinyl decals, visit us at www.walltowallwords.com.
All of our vinyl lettering decals include the decal, practice decals, and step by step instructions. Additional supplies needed are a level, pencil and a small amount of painter’s tape. Apply your new decal to a clean, smooth, dry, wall or glass surface using easy step by step instructions that are included. It’s that simple! Your freshly applied decal will have the professional look of a hand painted phrase with a minimal amount of time and effort…and no messy paint!
For best results, our DIY Wall Decal Always Kiss Me Goodnight works best on walls that are clean and smooth. If you have textured walls, the decal may not stick. Contact us if you have any questions. We would love to help you discern whether your surface will work well with our decals. We would love the chance to speak with you and answer any questions you may have. Happy decal-ing!
